
Setting up Windows 2000/.NET Server
Note that before you can use the information presented here, you should have already implemented the fake call trick.
Enabling Routing and Remote Access Services (RRAS)
The first thing you need to do is make sure RRAS is enabled. You should be able to find Routing and Remote Access in the Start Menu, under Administration Tools. If not you can try this shortcut, or look in Computer Management. Once you have found RRAS, make sure it's enabled. You should see your computer with a little red or green arrow by it, and some settings below that. If RRAS is not enabled, you can enable it by right-clicking on it, and select Add Server. In the dialog box that comes up just select "This Computer" and hit OK.
You may have to have the Routing and Remote Access Server service started to make some of the following changes. You can do this by right-clicking on Routing and Remote Access, and selecting All Tasks/Start.
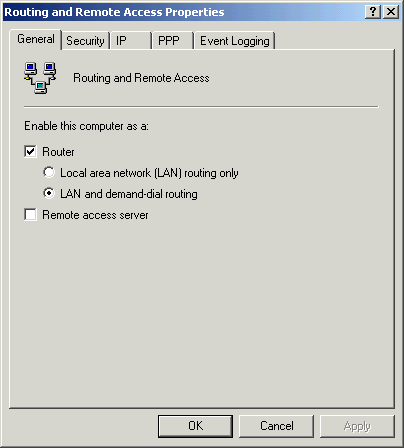
Right-click Routing and Remote Access and select properties. In the General tab make sure Router is checked, and the LAN and demand-dial routing radio button is set (see picture). Clear the box by Remote access server. In the Security tab, click on the Authentication Methods button. In the dialog box that pops up place a check in the box next to Unencrypted password (PAP), and clear the rest of the boxes. Then click Ok.

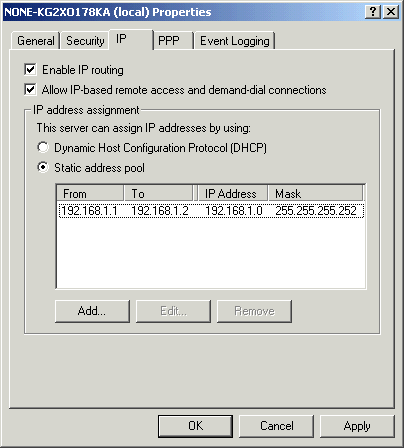
In the IP tab, check Enable IP routing and Allow IP-based remote access and demand-dial connections. Then select a Static address pool, hit the Add button, and define an address pool like in the picture below. Now we're done setting up RRAS properties so click Ok to make the dialog box disappear.

Creating a Demand-Dial Routing Interface
In the next section, Routing Interfaces, we'll be setting up the so-called Demand-Dial Routing Interface. Normally this is used to dial out to a network when certain resources are requested, but it happens that Windows allows this interface to be initiated bidirectionally. In other words we can dial in to this connection.

Right-click on Routing Interfaces and select New demand-dial interface. This will start the Demand Dial Interface Wizard. When it asks for the interface name, give it a name. Here I will call it Dreamcast. The name that you give it has to be the username you use when setting the ISP settings on the Dreamcast.

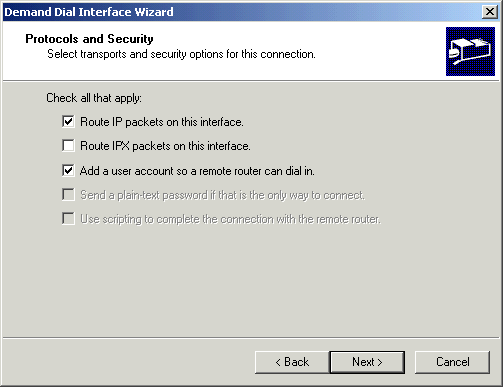
Next it will ask you about Virtual Private Networking. Select automatic and click next. If it asks you for a destination address or phone number, just leave it blank and hit Next. On the following page, Protocols and Security, check Route IP packets on this interface and Add a user account so a remote router can dial in.
The wizard will then prompt you for a password for the dial-in account. Again this must be the same password that you input in the Dreamcast's ISP settings. The next page of the wizard will ask you for dial-out credentials. Just put anything in the text boxes because this connection will never be dialing out, so these settings will never be used. Click Next, then Finish to complete the wizard.
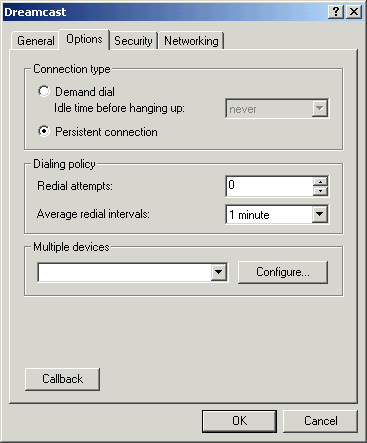
Now right-click the new demand-dial interface we just created and select Properties. In the options tab, make sure Persistent connection is selected. Then go to the security tab, click the Advanced radio button, and then click the settings button. In the Data encryption drop-box, select optional data encryption. In the Logon security section, once again select PAP authorization and clear the rest, and then click Ok. Now go to the Networking tab, and make sure Internet Protocol (TCP/IP) is checked. You can uncheck the other protocols if you want. Go to the TCP/IP settings and specify the IP address in the picture below, and then input your DNS IP addresses. You don't know your DNS addresses you say? Try this :) Click Ok on both the dialog boxes, and your done setting up the demand-dial interface.

Setting the IP Routing Configuration
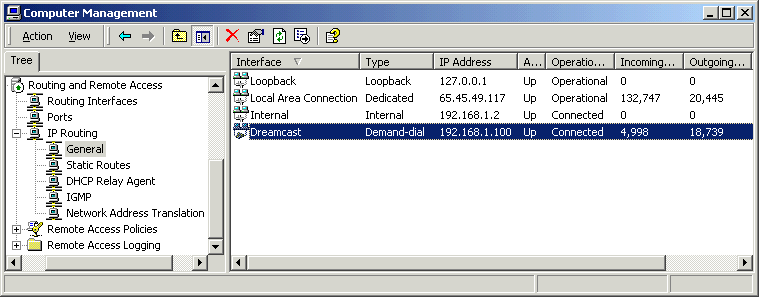
Click on General (under IP Routing, see picture below) and look to see if the Dreamcast Demand-dial interface is present. If it's not there you will have to manually add it by right-clicking General and selecting New interface. A dialog box with the Dreamcast demand-dial interface should pop up. Select Dreamcast and hit Ok. After the Dreamcast interface is on the list, right-click General and select New routing protocol. In the dialog box that comes up, select Network Address Translation (NAT). If it's not there it may already be installed.
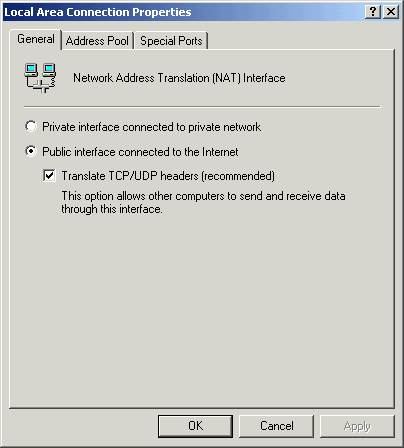
Now go to the Network Address Translation (NAT) section, right-click on it, and select New interface. Pick your LAN interface and hit Ok.
In the next dialog box, select Public interface connected to the Internet, and check Translate TCP/UDP headers, and then click Ok.
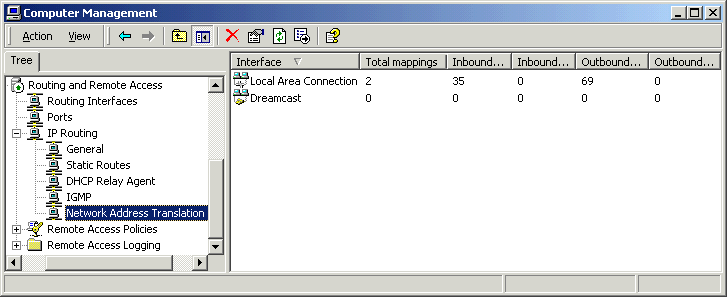
You need to add another new interface for the Dreamcast, but you may have to wait until the first time you connect. If you go to Add interface and Dreamcast is selectable, then you can do this now. If not then come back to this after you've completed this guide and established a connection. Add the interface for the Dreamcast the same way you did for your LAN above, except set the DC to Private interface connected to private network.
Chances are Remote Access is already allowed, but we'll go through it here just incase it's not. We need to make a policy like the one in the picture below, so if you don't have it, right-click and select Add new policy.

Name the policy, and for the conditions select Day-and-Time Restrictions. Select all the time slots (they should all turn blue) and then proceed. Make sure you set it to Grant remote access permission. After it's made you will need to edit it's properties, and click the Edit Profile button. Once again set the Authentication to use Unencrypted Authentication (see picture) and clear the rest of the boxes. When you have everything completed up to this point, you're finally finished ;)


Switching the Connection On and Off
Before you can use this connection you should have completed the steps in this guide.
We'll be controlling the on and off state of this connection through the Ports section of the Routing and Remote Access configuration. You'll need to leave the connection off when you're not using it and the RRAS service is running, or else you'll get problems with the modem trying to connect all the time. You can leave it on when the service is stopped if you want to.

Switching On
To switch the connection on, first make sure the RRAS service is running. Then right-click on Ports, and select Properties. In the ensuing dialog box, highlight the modem you're using and click the Configure button. Check Demand-dial routing connections (inbound and outbound) and click Ok. Now when you hit Ok in the Ports Properties dialog box the modem will become active, and attempt to connect with the Dreamcast.


Switching Off
To switch the connection off, right-click the modem in the Ports section and click Disconnect. Then right-click Ports, select properties, select your modem, click the Configure button, clear both check boxes, and Ok both of the dialog boxes. Yeah it's a pain in the butt. But it works. :)
Alternately you could just stop the RRAS service. It's easier but it takes longer that way.
If you've done everything correctly, you should be able to get something like this:

If your screen looks more like this:
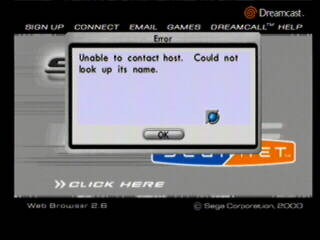
...then I would say did you remember to finish setting up the Net Address Translation?