Bu sefer elimizde küçük bir güncelleme var, bu sebepten tüm paketi tekrar dağıtmaya gerek görmedim. Paketin içinde sadece 1.72 exe dosyası var, sadece ihtiyacı olanlar indirebilirler.
Bu aralar minecraft oynuyoruz. Daha doğrusu oynuyorduk, taa ki bir gün aniden LAN oyun bağlanmamaya başlayana kadar. Önce firewall kurallarını kontrol ettim, java’yı silip yeniden kurdum. Firewall izinlerini güncelledim. Değişiklik yok. Açık LAN oyunları laptopta görebiliyor olmama karşın bağlanmaya kalkınca 1 dakika kadar bekleyip “connection timed out” hatası veriyordu.
Ne sunucu makinede, ne de laptopumda hiçbir değişiklik yapmamıştım, oyun bir şekilde bozulmuştu herhalde, ben de yeni sürümü görüp önce 1.4.5’e sonra 1.4.7’ye güncelleme yaptım. Her iki sürümde de problem devam etti.
Önce peşini bıraktım, ve oğlum tek başına creative mode’da takılmaya başladı fakat bu ancak 2 hafta oyaladı onu, sonunda yine yakama yapıştı. Sonunda problemi çözmek elzem olmuştu. O sıra client olan laptop’a win8 kurduğum için tüm ayarlar yine gitmişti, ve minecraft’ı sunucuda “open to lan” yaptığımda da acaip bir durum ortaya çıkmıştı. Minecraft ip adresi alamıyordu, dolayısı ile oyun 0.0.0.0:53448 gibi bir ip adresi üzerinde açılıyor görünüyordu. Sanırım bu büyük bir problem değil. Yine de çözmek istiyorsanız, Windows “Network and Sharing Center” yani (tahminen) “Ağ ve Paylaşım Merkezi”ne girip, ana bağlantınızın dışında kalan tüm bağlantıları kapatmanız gerekiyor. Ben arada vmware kurmuş olduğum için orda sanal ağ hizmetleri vardı. Bu fazla bağlantıları üzerlerine sağ klik yaparak devre dışı bırakın. Sağ klik olmuyorsa aygıt yöneticisinden ya da ağ aygıtları kısmından da kapatabilirsiniz. Tek bir aktif bağlantı bıraktığınıza emin olun.
Bundan sonra minecraft artık doğru ip adresi almaya başlar.
İkinci sorun ise firewall’dan kaynaklanıyor. 4-5 Firewall kuralı ayarlamaya çalıştıktan sonra pes ederek firewall’ı toptan kapatma kararı verdim ve oyun çalışmaya başladı. Firewall’ı her iki uçta da kapatmanız gerekiyor. Fakat bunu Public, Private ve Domain alanları için ayrı ayrı kapatmanızı tavsiye ediyorum. Normalde bağlantınız hangi kategorideyse onu kapatmanız yeterli olacak gibi görünse de benim durumumda malesef olmadı.
Firewall’ı kapatmak bir güvenlik riski oluşturur. Bu yüzden oyunu bitirdikten sonra firewall’ı tekrar etkinleştirmeyi unutmayın. Yine de çok büyük bir risk yok, çünkü modem/router’ınız zaten aktif bir firewall olarak kapı bekçiliği yapıyor zaten. Windows firewall’ı genellikle LAN’daki tehditlerden korur sizi. Eğer hava alanı ya da işyeri gibi kalabalık bir LAN’da iseniz o zaman firewall kritik önem taşırken, evde cep telefonunuz, tabletiniz ve bilgisayarlarınızdan oluşan LAN pek firewall’a ihtiyaç duymaz.
17 Yıllık bir gelenek, zx spectrum’un en eski ve en köklü geleneksel yarışması, dandik oyun yapma yarışması bu yıl bendeniz tarafından organize ediliyor 😀 Yarışmanın kuralı gereği bir sonraki organizatör, en kötü oyunu yapamayan yarışmacılar arasından seçiliyor. Kazanan kişi ise -en kötü oyunu yapabilmiş kişi- büyük şan şöhret kazanıyor (belki de birkaç hediye daha).
Zx Spectrum’un göz bebeği, en kral coder’ınyla en dandik programcısının yan yana yarıştığı ve şanslarının eşit olduğu bir yarışma düşünün. İşte bu o yarışma. Sizleri de berbat oyun yapma yarışmasına ısrarla bekliyorum.
There are some tools that do the same job but, for other operating systems. Not to mention, my latest *recompile* of zmakebas for windows (http://arda.kisafilm.org/fish/win_zmakebas.rar), but it is kind of outdated.
CheqEdit
it’s a simple and small program that helps you to draw 64×48 graphics on screen in GRAPHICS MODE. Program can output as text in CHR$ format, control codes format, a special compressed data format or special Basin/Zmakebas format, all in Basic. (Edit: Chris Cowley reminded me that this mode is native resolution for ZX81, and as CheqEdit already supports zmakebas style output, it is somehow compatible with zx81 graphics.)
Program can also import/export image files (bmp, png, jpg etc..). What is it for?
if you want to create big graphics using G mode, this program can help you.
How to import text into zx spectrum?
This is tricky, you have to find an emulator or a tool to convert plain text into zx basic format. I recommend using basin. For Zx81 there is a program called “zxtext2p”. You can find it’s web address at the bottom of the post.
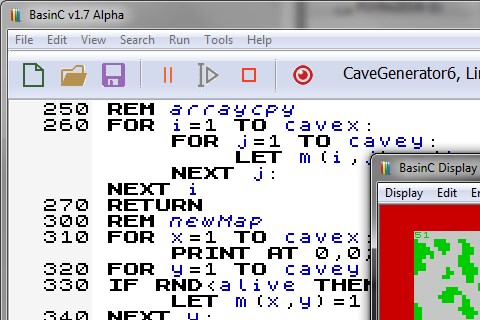
Here is the screens:
Editing with a mouse (screencap software couldn't capture mouse)
It’s a first generation “open” handheld console, possibly the first one. Gp32 is designed and sold by a Korean Company called Gamepark (Creators of caanoo, wiz, gp2x etc). It has a big 3.5″ color LCD, 133mhz 32bit ARM processor, 8MB ram. It has no custom cpu or gpu, everything is handled by the CPU. The GP32 was sold between 2002-2005, then superceeded by Gp2X. In it’s golden years, the console’s community was flourished by counltess homebrew originals, countless software ports and hardware hacks. There are even some original boxed smc cardtridge games. There are no official sales figures, but GP32 is suspected to sold about 15000 units worldwide.
a GP32 handheld console
We will take a look at the keyboard enhancement for GP32: a simple chatboard hack. Read on:
Buraya yazmaya unutmuşum nedense. Halbuki bu benim en memnun olduğum çalışmalarımdan biriydi. 2010’un kasım ayında biraz da kafamı dağıtmak için zx microdrivelar ile oynamaya başlamıştım. Hazır elimde 10-15 kartuş olduğu için bunların içine sevdiğim oyunları doldurup hızlıca yüklemek istedim. Ne kadar masum bir istek, bu programa dönüştü:
Tabii bu işi yapmanın sürükle-bırak şeklinde olmasını beklemiyordum. Ama yine de küçük bir uğraşla başarılması gerekir öyle değil mi? Fakat işin aslı böyle değilmiş, çünkü zx spectrum’a çıkmış oyunların neredeyse tamamı kendi özel yükleyicilerini (custom loader) kullanıyordu ve bu yükleyiciler teyp’den gelen veriyi yüklemek üzere tasarlanmıştı. Dolayısıyla tap ya da tzx dosyalarını orjinal halleriyle microdrive’a atarak yüklemek imkansızdı. Çünkü oyunun loader kısmını microdrive’dan yüklediğinizde çalışan program verinin devamını teypten yüklemeye kalkıyordu.
Sonra aklıma emülatör snapshot formatları geldi. Snapshot’lar bilgisayarın tüm hafızası ve z80 işlemcisinin yazmaçlarını bir dosyaya görüntüleyen imajlardı. Bunları microdrive’dan yüklemek çok kolay olmalıydı!!! …mı acaba? Değildi elbette. Çünkü imaj dosyaları sadece tüm ram’i kaplamakla kalmıyor, z80 işlemcisinin de yazmaçlarını kaplıyordu. Bu durumda sizin sinclair basic’den çağırdığınız LOAD eylemi, yükleme tamamlandığında tekrar basic’e dönmek istiyordu, fakat imaj tüm hafızayı kapladığı için geriye dönülecek bir basic kalmıyordu. Dolayısıyla hem oyununuz kaldığı yerden devam edemiyor, hem de z80 yazmaçları henüz yüklenmemiş oluyordu. Bu durumu bertaraf etmek için tüm sna2tap tarzı araçlar yine kendi özel loader sistemlerini geliştirmişlerdi. Fakat, doğru tahmin ettiniz, başa döndük, dönüştürülen dosyalar yine teypten yüklemek için tasarlanmış oluyorlardı!!! Yani microdrive’a özgü bir loader yazmadıkça ya da standard loader ile yüklenen bir tap dosyası oluşturamadıkça hiçbir oyunu microdrive’a çeviremeyecektik!!!
Bir çıkmaza düşmüştüm. Nasıl olabilirdi bu? Bu devirde, zx spectrum gibi emülasyon sahnesi çok hareketli bir platformda hala yazılmamış bir çevirici?!
Problemin çözümü de kolay değildi. Çünkü standart loader veriyi yükledikten sonra basic’e dönmek istiyor, ki siz de öyle olmasını istersiniz çünkü veri yüklendikten yine basic’den vereceğiniz bir komutla yazmaçları yükleyip, oyunu kaldığı yerden devam ettirecek kodu başlatmanız gerekecektir. Yani BASIC oyun başlatılana kadar hafızada kalmak zorundaydı.
Birkaç deneme yaptım. Acaba basic güvenli olarak kaç byte alana ihtiyaç duyuyordu? Eğer hiçbir aygıt takılı değilse 500byte kadar. Tabii microdrive taktığınızda yeni eklenen komutların değişkenleri sayesinde bu biraz yükseliyor. Yetmiyor, bir de loader kod çalıştırmalısınız, yani minimum:
10 LOAD “” CODE: RANDOMIZE USR 40000
bu kod aşağı yukarı 50 byte yer kaplasa sonuç 1kb. Biraz da pay bırakınca (printer takarsanız buffer 256byte mesela) 1.4kb alan gerekiyor. Ayrıca bir de asm ile yazılmış bir başlatma koduna ihtiyacınız var. Bu kod işlemcinin yazmaçlarını dosyada göründüğü gibi yükleyip, PC yani dosyadaki Program Counter’a zıplaması gerekiyor. 17 byte zaten yazmaç verisi tutuyor. 22byte’da yükleyen kod. minimum 39byte daha. Eğerki microdrive’a yükleyecekseniz demin yazdığımız LOAD “” CODE kısmı LOAD *m,1,”dosya” CODE XXXXX,XXXXX şeklinde düzenlenmeli, yani daha fazla byte gerek.
Uzun lafın kısası, oynamak istediğimiz oyunun kapladığı hafıza içerisinde kesintisiz olarak bulunan 1355byte’lık bir alana ihtiyaç var. Bu alanı ne için kullanacağız? Snapshot imajının BASIC’le kesişen 1.4kb’lık kısmını bu boş alana taşınması, ve yükleme tamamlandıktan sonra oyun başlatılmadan önce yerine geri yapıştırılması gerek. Ve bu son yapıştırma işlemi basic ile değil, asm koduyla halledilmeli ki basic güvenle silinebilsin.
Fakat böylesi büyük bir “düzlük” her oyunda bulunamıyor. Oran %50 diyebilirim. Yani yöntem her durumda çalışmıyor. Daha kökten bir çözüme ihtiyaç vardı ve bu blog’u okuyan birçok kişinin aklına geldiği gibi, ben de sıkıştırma çözümlerini kurcalamaya başladım. Zx spectrum z80 işlemcili olduğu için ortalık sıkıştırma programı ile dolu. Zip, rar, ace, lha, lzh gibi tanıdık formatlar için bile kodlayıcı/çözücüler var. Fakat çözücü kısmın da ram’de depolanacağını, her çözücü kodun benim imajımdan yer yediğini düşünürerek küçücük bir çözücüsü olan bir sıkıştırma programına ihtiyaç duyuyordum. Ama aynı zamanda bu program bana her durumda en az %10 sıkıştırma sağlamalıydı.
Uzun ama çok uzun denemelerimden sonra bu işi başaracak çok alternatif olmadığını gördüm. Ama en ilginci bitbuster idi. Kardeş platform diyebileceğim MSX için yazılmış bitbuster extreme windows tabanlı bir paketleyici, z80 tabanlı 79byte büyüklüğünde bir decoder’den oluşuyordu. Beni biraz uğraştırsa da (asm konusunda biraz acemiyim) bitbuster’ı kendi ihtiyaçlarıma göre bir gecede düzenledim, sonuç 88byte olmuştu. Bitbuster etkileyiciydi, snapshot dosyaları standard 49kb boyutundadırlar, bu formattaki chuckie egg 11kb, Cobra 23kb ve tüm hafızayı kaplayan ve 1 byte bile boşluğu olmayan batman 33kb’a kadar küçülebiliyordu. Bu basic için istediğim kadar ram’e sahip olmam demekti. Tabiiki sonuç olarak yüklenen imaj 88byte bozulmaya uğramak zorundaydı. Bunu ekrana yüklemeyi tercih ediyorum. Eğer snapshot’larınızı ekran tazelenmeden önce alırsanız, oyununuz başlatıldığında ekran yeniden çizileceği için bitbuster’ın izi de ortadan kalkabiliyor.
Sonunda c# ile dosyayı sıkıştırıp uygun pozisyonlara yerleştiren “visual snapshot converter” adında bir program yazdım. Bu program zx spectrumda snapshot dosyalarını standart loader ile yüklenebilen TAP dosyaları haline getiriyor. Bu yöntem üretilen dosyaları tüm zx spectrum donanımlarına uyumlu hale geliyor olması demek oluyor.
Yukarıda anlattıklarım 7.11.2010 ile 23.11.2010’u kapsayan aralıkta başlayıp sonlanmış bir olaylar silsilesidir. Fikirlerin çoğu, arkadaşım ASM ile yaptığımız tartışmalar sırasında çıkmıştı. Ben kendi çeviricimi yapmaya çalışırken asm benden önce birşeyler kotarıyor, çıkan yeni problemleri farkedince geliştiriyordu.
Asm, farklı bir yöne gitti, o RLE sıkıştırmaya yöneldi, bu şekilde her seferinde 1.4kb kazanmak mümkün olamayabiliyor. Oran %85 civarında. Ayrıca asıl hadef TAP dosyası üretmek iken, asm direkt olarak wav dosyaları üretmeyi seçti. Bence ses dosyası üretmek başlı başına bir problem. Eğer komut satırından çalışan zxBoot’u edinmek istiyorsanız buraya tıklayın.
Şu anda asm’nin Zxboot’u ve benim yazdığım Visual Snapshot Converter dışında bu işi yapan program yok. Ama benimki daha şekilli oldu :))
Denemek isteyen buyursun, sonuçta deneysel bir sürüm daha var burda, proof-of-concept diyebiliriz. Onun için her çevrimden önce programı kapatıp açmanızı tavsiye ediyorum.
Simplistic Version, SnapToTap R2
Nasıl kullanacaksınız?
Kolay: Yükle, sıkıştır, kaydet.
Detaylı anlatım:
1.Sadece Zx spectrum 48k SNA formatında dosyaları çevirir. Bir SNA dosyası bulunuz. Bu dosyalar tipik olarak 49kb boyutundadırlar.
2.”Open 48k Sna” butonuna basın ve bu dosyayı seçin. Dilerseniz show memory map seçerek zx spectrum’un ram’inin grafiksel olarak görüntülenmesini sağlayabilirsiniz.
3.Otomatik olarak sıkıştırma penceresine geçilecek, “Compress” butonuna basınız.
4.Sıkıştırma işlemi karışık ve yavaş. 100% olana kadar bekleyiniz. Hiçbir düğmeye basmayınız.
6.Çıkış penceresinde loader seçimi yapınız. Şu anda sadece microdrive ve teyp var, ileride +3Dos disk yükleme programcığını da ekleyeceğim, şu anda sürücü lastiğim kopuk olduğu için deneyemiyorum 😀
7.”Save” butonuna basın.
Bitti.
Son Sürüm için aşağıdaki bağlantıyı takip edin eski sürümler için sol taraftan “Downloads and Development” bağlantısını takip edin:
25 yıllık yazılım firması “Elite”, yeni iTunes uygulamalarını duyurdu:
Bugünden itibaren iPhone kullanıcıları, sadece 56 Pence’e (1$’dan az) zx spectrum emülasyonu yapabilecekler. Elite Kolleksionundaki oyunlar şöyle imiş:
– Turbo Esprit #3 on top 100 best games, voted for by visitors to World of Spectrum
– Saboteur #10 on top 100 best games
– Chuckie Egg the classic, developed by Nigel Alderton
– Harrier Attack inspired by the conflict in the South Atlantic
– Frank Bruno’s Boxing the UK #1 Best-Seller
– Buggy Boy the arcade original driving game
Doğrusu, Chuckie Egg’i düşününce, touch screen kullanarak nasıl oynanacağını bilemiyorum. Kaldı ki, diğer oyunların aksine, bence o oyun sadece ve sadece orjinal 48K’nın kauçuk tuşlarıyla mükemmel oynanabilir.


")


